Core functions
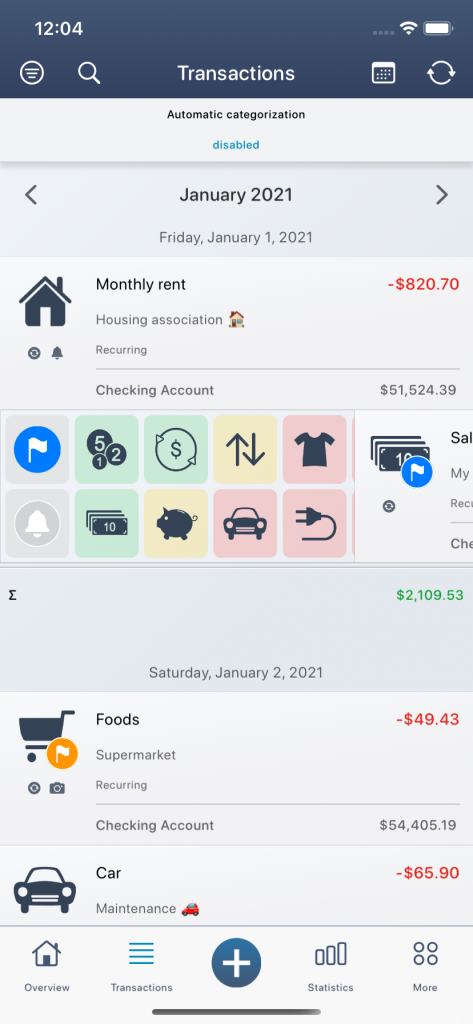
Transactions
One-time income and expenses
To create a one-time income or expense, you need to click the big plus icon in the bottom center. You can then create a new one-time expense in the top left and a new one-time income in the top right.
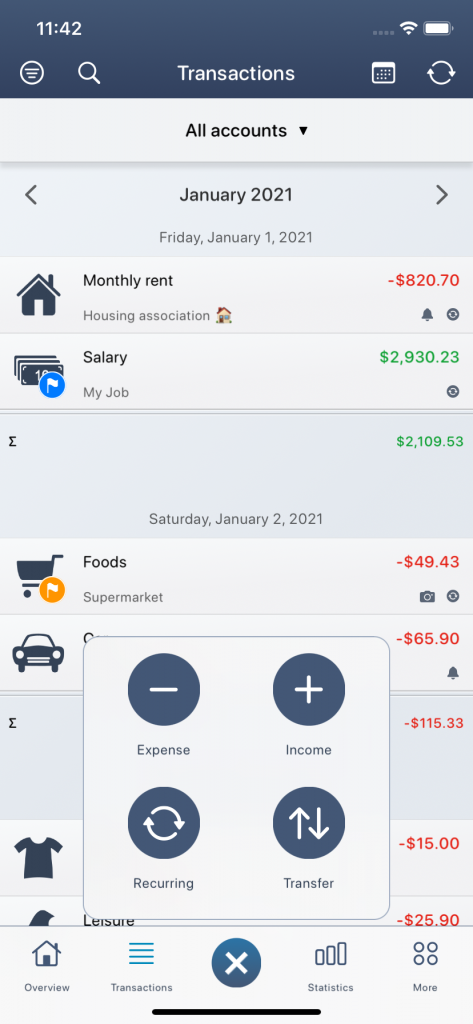
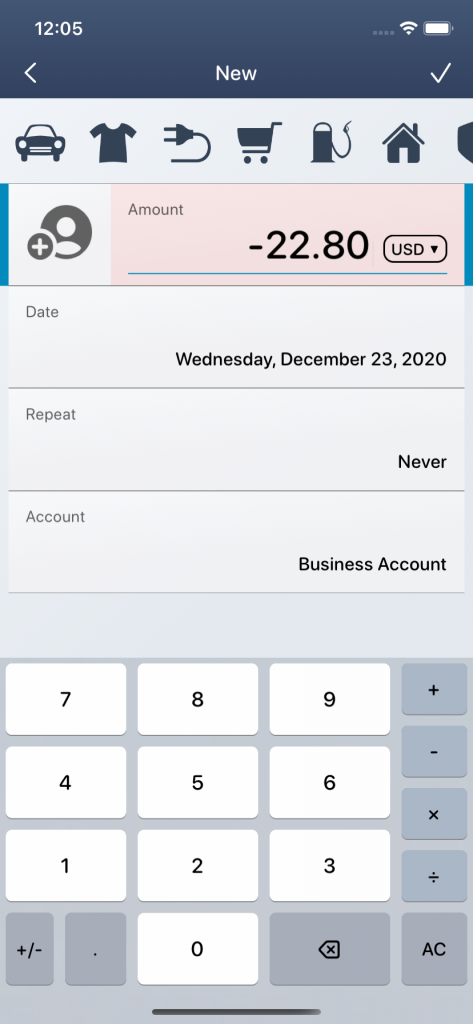
In the new editing window you can now create your new transaction and you can decide by yourself how detailed you want to make your entries. The more detailed your transaction is described, the more precisely you can generate the evaluations later.
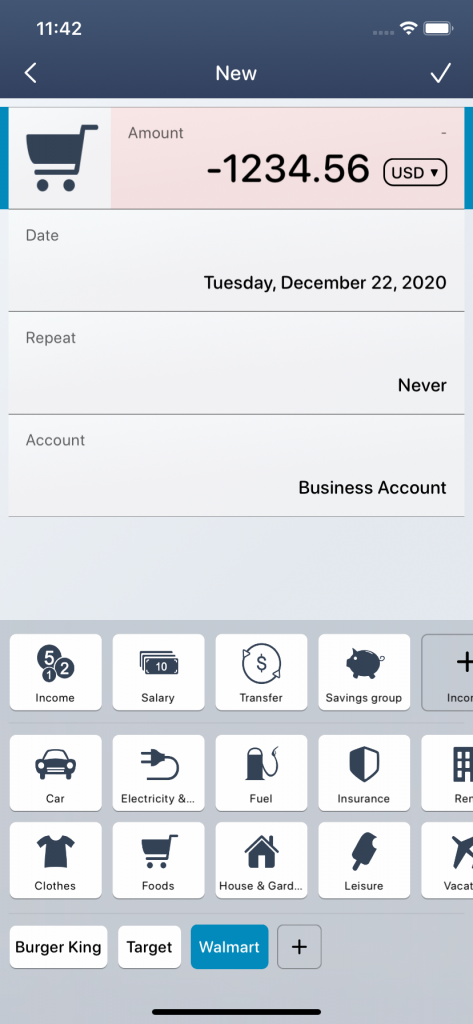
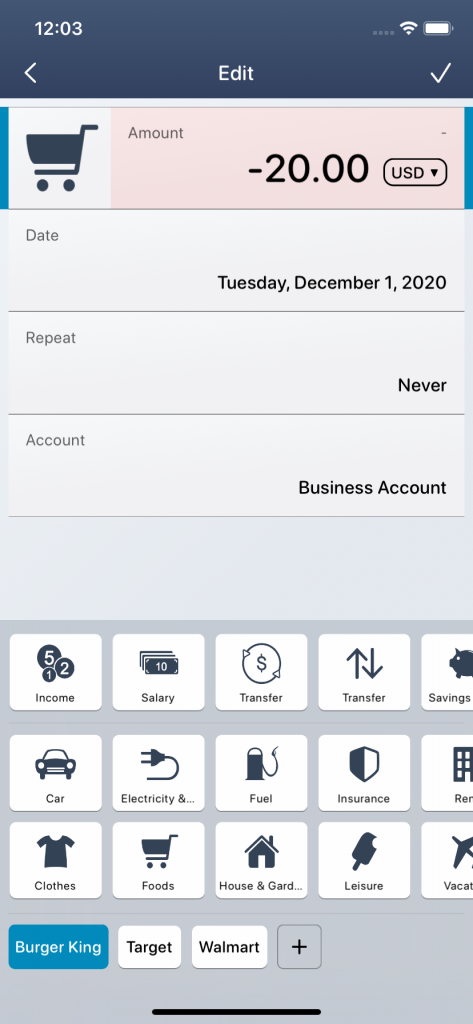
If it is a new expense, the amount is given a negative sign by default. Revenues have positive signs. However, this is not a must since you can change the sign of the amount as you like.
Hint: With a refund, you can also make the sign of an expense positive by clicking on “+/-” on the bottom left of the keypad.
To the right of the amount field, you can also specify the currency. The current exchange rate for the specified main currency is then determined.
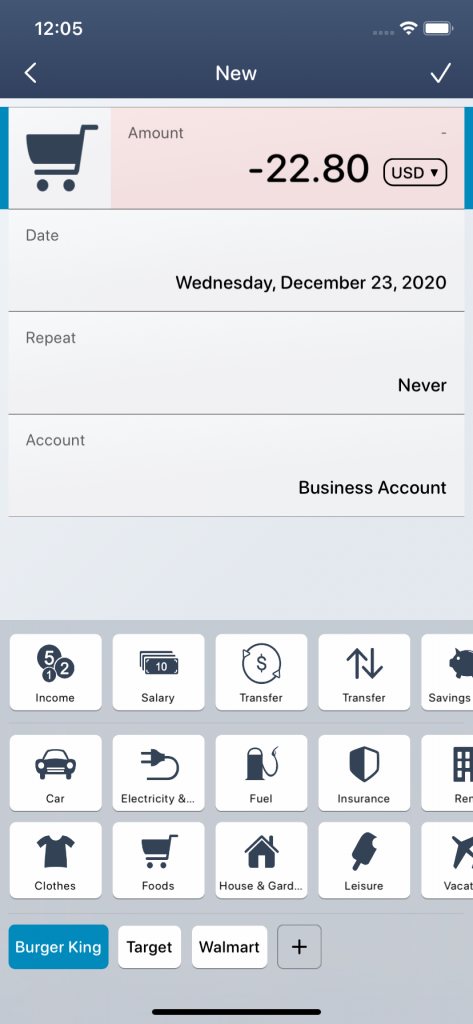
To the left of the amount field is the currently assigned category of the transaction. If you click on the category picture, you can re-categorize the transaction. The income categories are listed in the top row and the expense categories in the two rows below. If you click on another category, the sign of the amount field is adjusted. If you have also created hashtags for the corresponding category, they will be listed at the bottom. To activate hashtags (subcategories) for the transaction, you have to click on them. Hashtags from different categories can also be activated for a transaction.
Hint: You can also create special dummy categories such as for the category “Person” and add the hashtags “Mother”, “Father” and “Child”. If you now have a new expense for “Groceries”, you can first activate the relevant person hashtag for this transaction (e.g. “Father” when the father has paid for the purchases) and then the actual do the categorization for the “Groceries” category. In the diagrams you can then evaluate exactly who paid for the groceries.
The date of the transaction must be entered below the amount field. Optionally, you can also use the calendar to pick a date.
Below this is the “Repeat” field, where you can define whether the transaction should be repeated at regular intervals (every two weeks, every month, etc.) or not. The repeating transactions are explained in more detail in the next chapter.
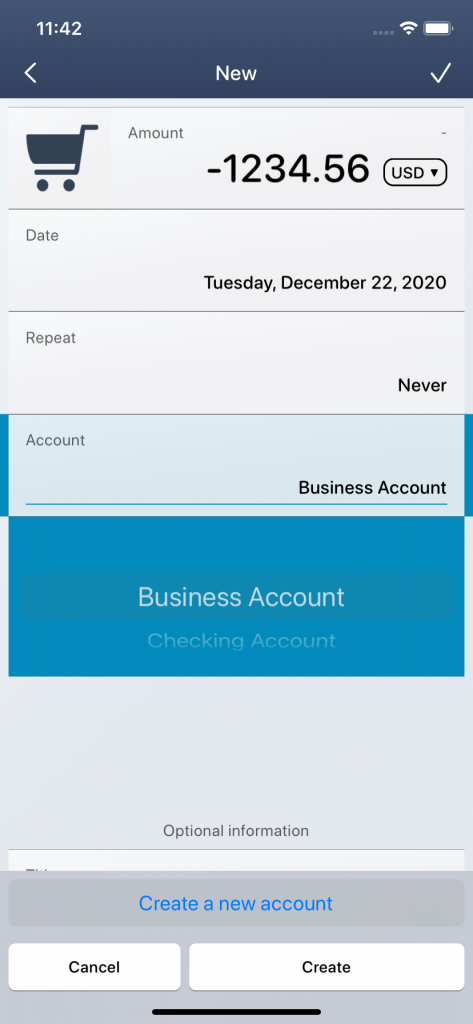
As last mandatory field you have to choose the account from which the transaction should be booked.
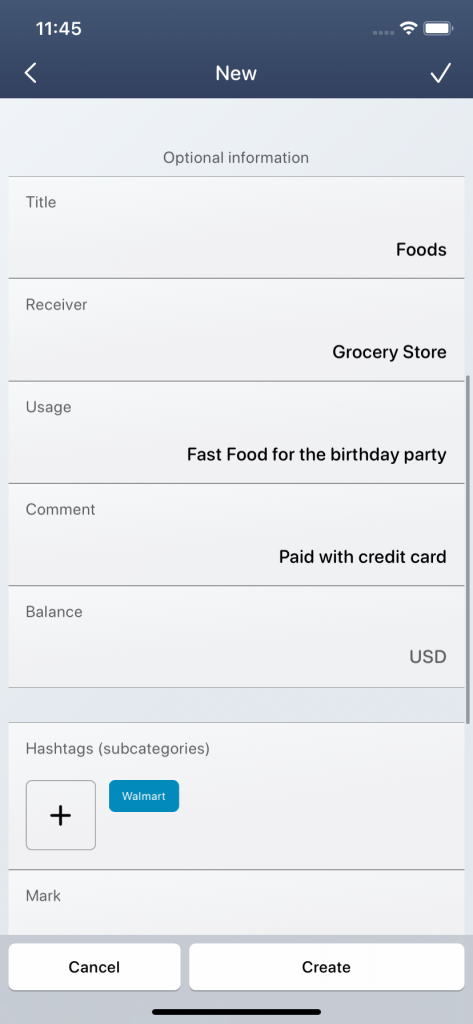
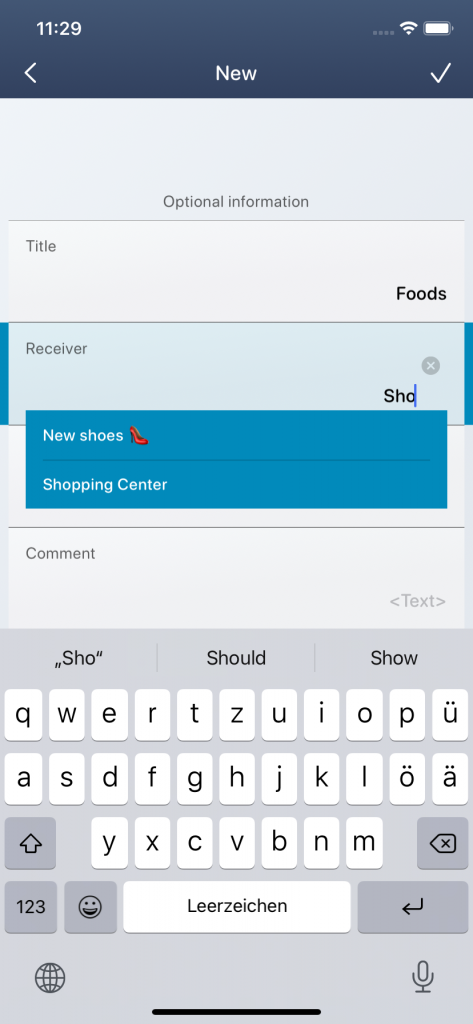
There is additional optional information below the mandatory fields to describe your transaction. These include the text fields “Title”, “Receiver / Sender”, “Usage” and “Comment”. With the help of the search functions in MoneyStats, you can evaluate these text fields and search and filter for specific terms or keywords.
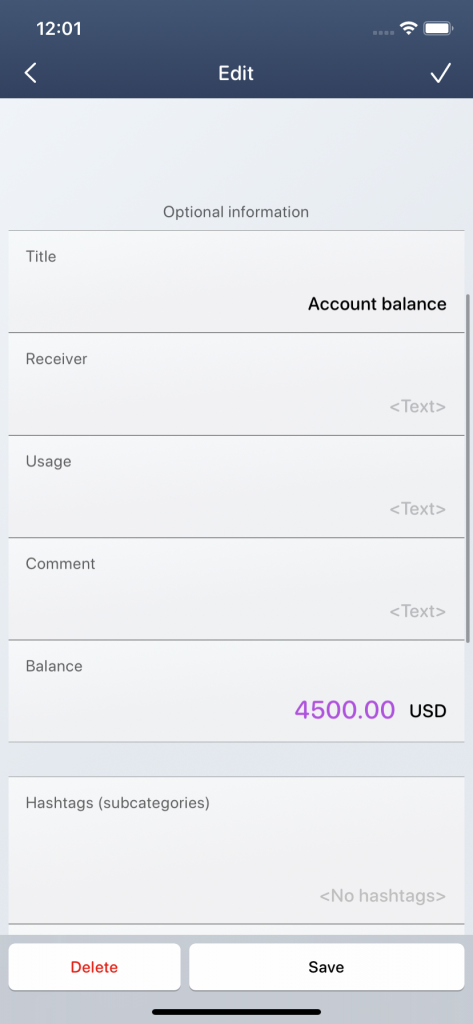
You can also assign a manual account balance to each transaction. With an active account balance, an amount at the top is not mandatory anymore and can be left blank. The manual account balances apply from the entered date and all newer income and expenses are added to the last known account balance. They are fixed values and replace the previously known account balance with a new static value. Account balances are shown with a purple color in MoneyStats.
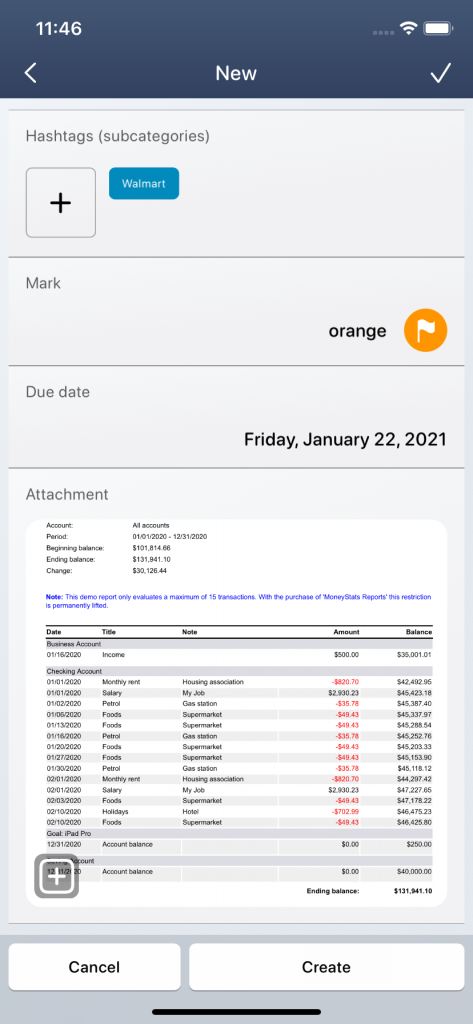
Below that is a special field for the “Hashtags (subcategories)“. As with the above categorization, you can activate or deactivate further hashtags for the transaction here. In principle it is the same function as above, the only difference is that the categorization is not changed when further hashtags are selected here. The focus in this menu is really only on the hashtags and not on the categorization, i.e. the category icon remains unchanged, even if you click on other categories to activate or deactivate hashtags.
With the help of the markings you can mark your transactions with a colored flag. You can then evaluate and filter these in the reports or in the search.
On the due date, you can reserve a payment date and / or create a reminder. In the overview, all the upcoming appointments are then summarized.
You can also attach receipts or invoices to each transaction. These are shown in the large block as a preview image at the bottom. To edit multiple or existing receipt photos, you just have to click on the large block and then a preview of all receipts and invoices that you have linked to the transaction opens.
If you are satisfied with the input of information, you can save the one-time transaction by clicking on the small tick in the top right corner. Alternatively, you can also click on “Create” or “Save” at the bottom right.
Recurring income and expenses
Similar to the previous chapter on creating one-time income and expenses, you can also create recurring transactions. Recurring transactions are repetitive transactions such as monthly rent or annual insurance costs.
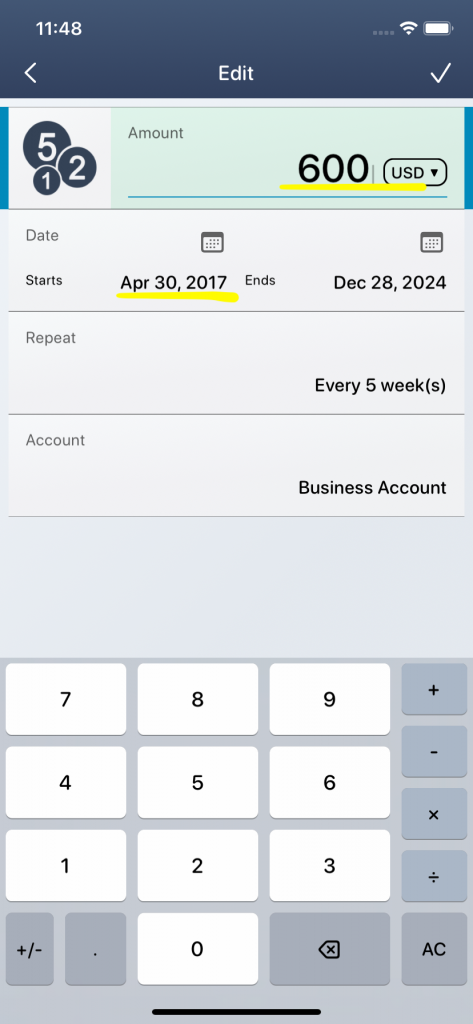
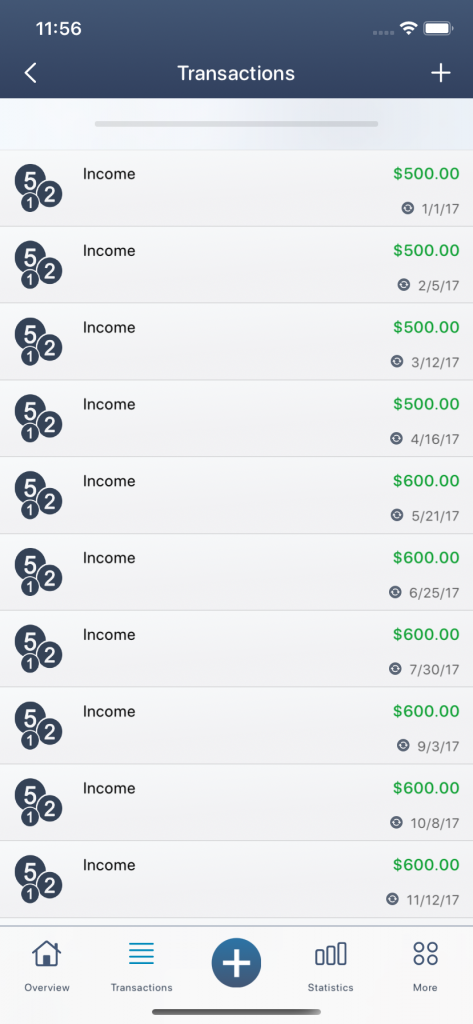
To create a recurring transaction, you need to click the plus icon at the bottom center. Then you can click on “Recurring” at the bottom left. Alternatively, you can also create a one-time transaction and then set an interval in the “Repeat” field (e.g. every 2 weeks, every year, etc.). Once the transaction is a recurring series, you need to set a start and end date. This period limits the repetitive transactions. The start date is decisive for the financial day of the recurring series. For example, if your recurring row has the starting date January 5th, 2020 and a monthly rhythm, the next transaction will take place on February 5th, 2020 and the transaction after that on March 5th, 2020 and so on.
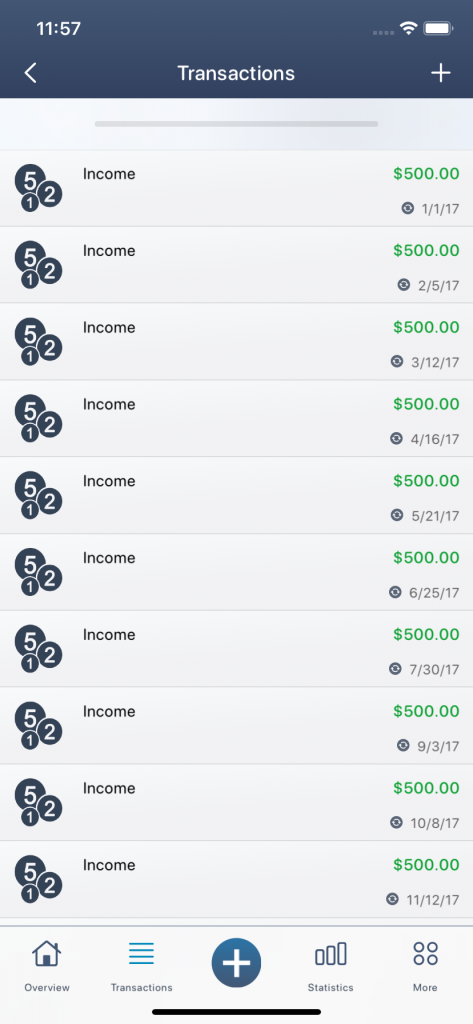
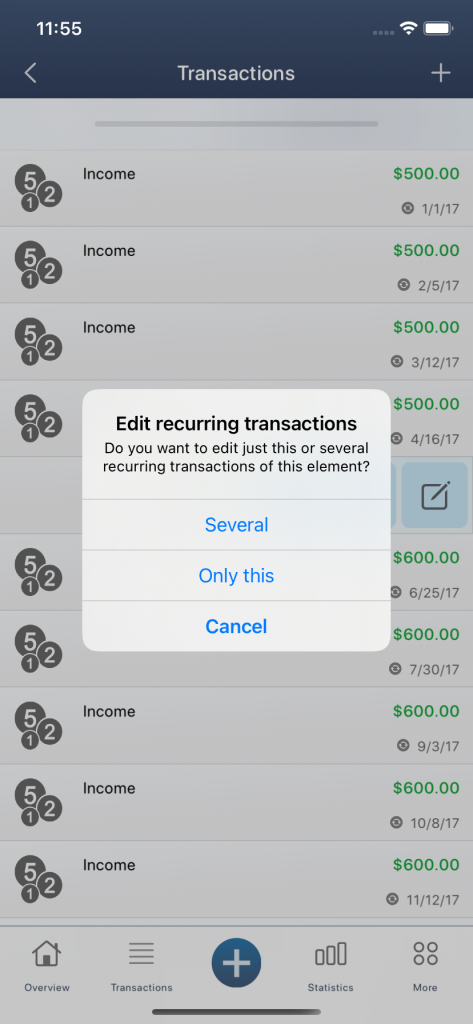
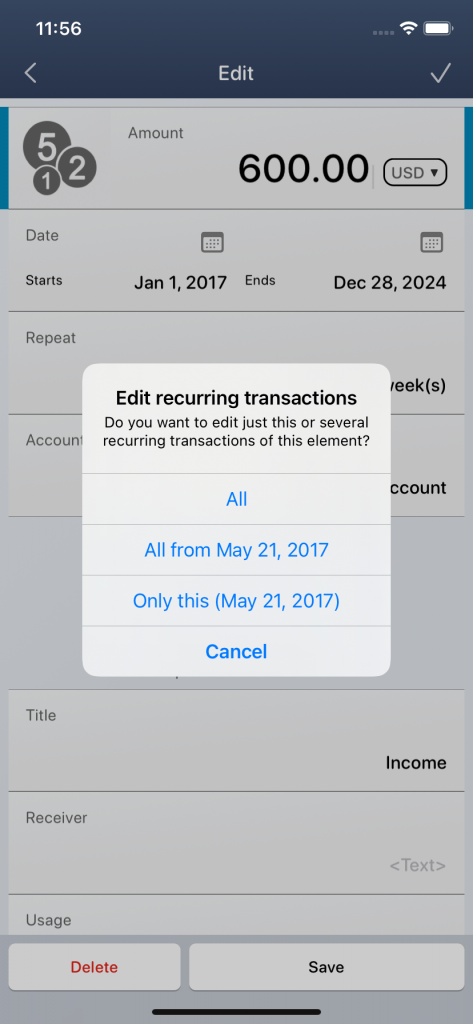
All elements of the recurring series are entered directly in the transaction view and are identified by the small circle symbol with the cyclic arrows. You can also edit individual elements of the recurring series. You have the choice whether you want to edit only a single element (“Only this”) or the whole row (“Several”).
If you select “Only this“, the individual element of the recurring series will be treated like a normal one-time transaction and the changes will only affect the single element of the recurring series. All other elements remain unaffected.
However, if you choose “Several“, the changes affect multiple elements of the recurring series. Which exactly do you define when saving the recurring transaction.
Using the example above, a monthly salary payment of USD 1,500 was made as a recurring series. The salary receipt falls on the 5th of each month (January 5, February 5, March 5, etc.). If you have now received a salary increase of USD 100 and the salary receipt is shifted 5 days back to the 10th day of each month, you only need to adjust the amount and select April 10, 2020 as the start date. When saving the recurring transaction, the next question is whether you want to apply the changes to “All”, “All from April 10th, 2020” or “Only this (April 10th, 2020)”. If you click on “All from April 10th, 2020”, all transactions after April 10th, 2020 will be processed. All transactions before this start date remain unaffected. In addition to the amount adjustment, the booking day for all newer transactions after April 10, 2020 has therefore been shifted to the 10th day.
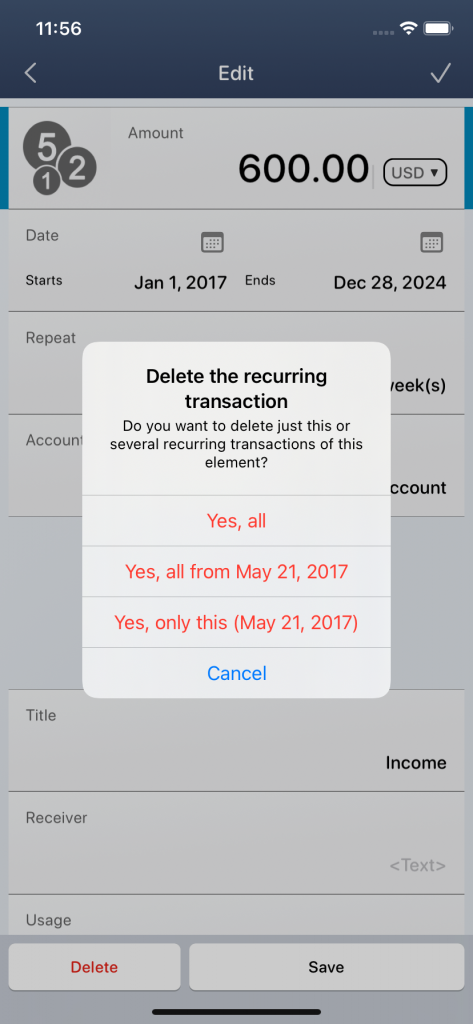
Similarly, you can delete certain elements of a recurring series by also defining exactly which elements of the series should be taken into account.
Warning: If you edit individual elements of a recurring series, they still remain part of the complete series. For example, if you edit a single element in the series and save it and apply the changes to “All”, all individual changes are overwritten and all elements are brought back to a common denominator.
You can find a summary of all your recurring transactions in the top right corner of the transaction view. All recurring series are listed there and grouped according to income and expenditure. Individual changes, on the other hand, can only be seen in the transaction view, where all elements of the series are individually available and can be edited.
Transfers
You can use the “Transfers” to transfer an amount X from one account A to another account B. For this purpose, an amount X is deducted from account A and credited to account B.
To create a new transfer, you have to click on the plus symbol in the bottom center and click on “Transfer” in the lower right corner. You can then edit your transfers in the same way as in the previous chapters and add further information. By default, a one-time transfer is created, but you can also create a recurring transfer by specifying an interval in the “Repeat” field. In contrast to a normal transaction, you have to define a source account and a target account.

As shown in the screenshots, for example, an amount of USD 5,000 is transferred from the current account (source) to the savings account (target). A transfer is categorized by default with a specific category. This special category has the property that transactions with this categorization are not evaluated. The two transfers are taken into account in the account balance, but not in the monthly balance sheet. As a rule, transfers are only money movements and should therefore not be evaluated as a profit or loss. However, if you also want to see the transfers in the balance sheets, you can easily edit the special category “Transfer” in the category view and set it to “evaluated”. Alternatively, you can of course categorize your transfers with another category.
Hint: Transfers are categorized with a special category so that these are not taken into account in the profits and losses, but only in the account balances. You can also categorize your transfers with other categories or set the mode of the special category to “evaluated”.
The two transfer entries always remain linked. Do you change for example the amount or the date of the transfer, the changes affect both the source account and the target account. If you delete an element of the transfer, both elements will be removed.
Account balances
The account balance is the sum of all income, expenses and transfers to a specific account at a specific point in time.
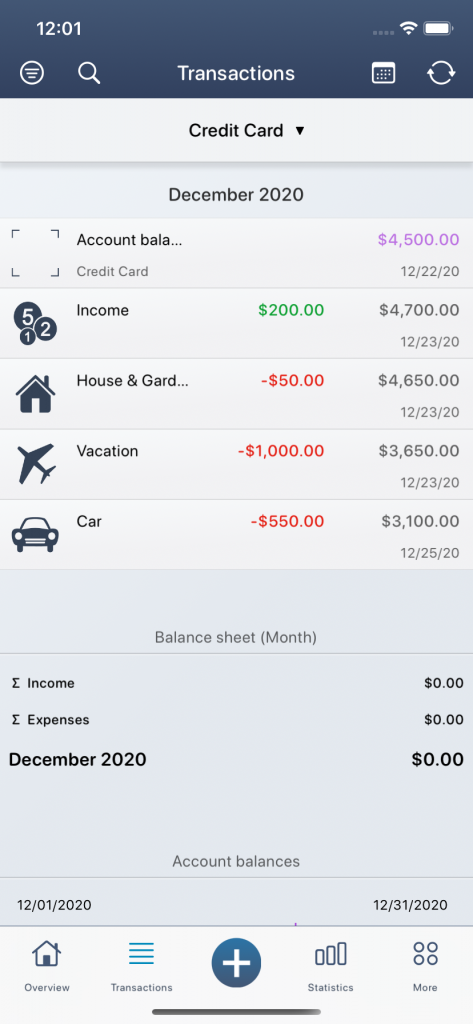
To show the current balance for each transaction, you can activate the “Complete view” or “List view” in the transaction view at the top left. The individual balances are accumulated depending on the date. Below the listed transactions you can see the current account balance for the respective period, namely the old balance and the new balance.
If you have not defined a manual account balance for a specific account, the initial balance of the account is USD 0 by default.
To create a new manual account balance, you can simply create a new one-time income or expense. Below the optional information you will find the field “Balance”. You can enter an account balance there. Depending on the selected date of the transaction, this account balance is then set as a fixed value. All newer transactions are then summed up to the last known manual account balance. So you could also create multiple manual account balances. For example, the result would look like this:
| Date | Name | Amount (USD) | Balance (USD) |
|---|---|---|---|
| 2020-01-01 | Balance | empty | 10.000 |
| 2020-02-01 | Petrol | -50 | 9.950 |
| 2020-03-01 | Groceries | -50 | 9.900 |
| 2020-04-01 | Gifts | -100 | 9.800 |
| 2020-05-01 | Balance | empty | 2.000 |
| 2020-05-02 | Groceries | -100 | 1.900 |
| 2020-05-03 | Salary | 1.000 | 2.900 |
| 2020-05-04 | Clothing | -200 | 2.700 |
| 2020-05-05 | Petrol | -50 | 2.650 |
If you have entered a value for the account balance below the optional information, then an amount at the top is no longer required. Manual account balances are shown in purple in MoneyStats.
Categorize
Income and expenditure categories
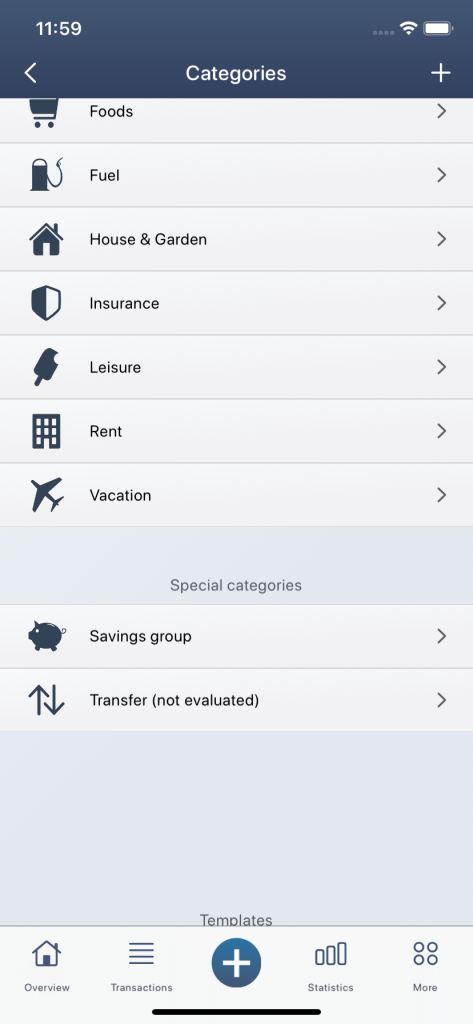
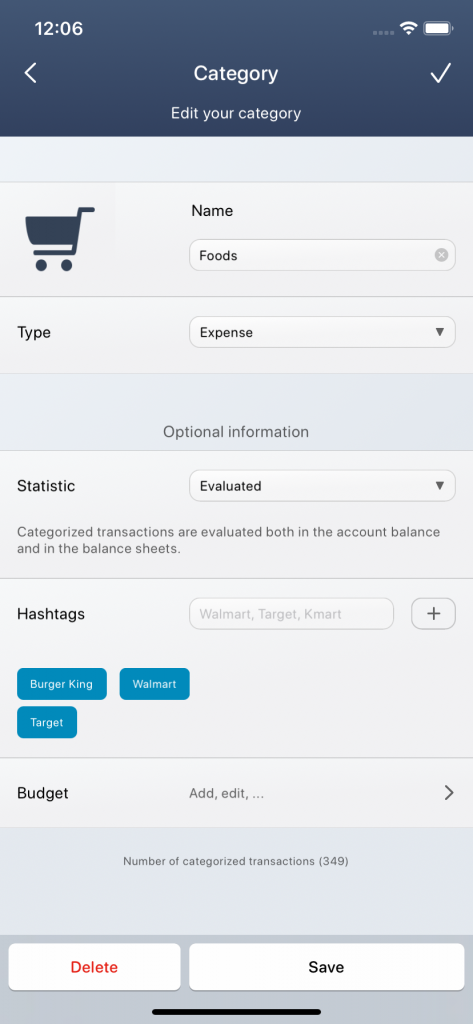
In MoneyStats you can categorize your transactions with different categories. A basic distinction is made between income and expenditure categories. But this is just a rough breakdown so that you can evaluate your transactions faster and more efficiently. You can also add more categories and edit or delete existing categories (under More / Settings / Categories).
When creating or editing a transaction, you can click the category icon at the top left to open the category selection. There you will see all of your income categories at the top and all of your spending categories below. If you click on a category symbol, your transaction will be categorized with the corresponding category.
If you click on an expenditure category such as the “Groceries” category, the amount field becomes negative. However, the sign of the amount becomes positive for income categories.
Hint: With a refund, you can also make the sign of an expense positive by clicking on “+/-” on the bottom left of the keyboard.
The associated hashtags (subcategories) of the “Groceries” category are shown below the category selection and can also be activated if necessary.
To add a new category, you can also scroll to the far right and click on the plus symbol or to switch directly to the category view.
Hint: You can also press and hold a category in the category selection menu to edit it directly.
But you can also categorize your income and expenses directly in the transaction view. All you have to do is click on the category icon on the far left. The special functions then open with the appropriate category selection. This function is ideal for quickly categorizing without having to change the window.
In the category view you can also activate the “quick selection“. Relevant categories are offered above the amount field when creating new transactions. Depending on the amount entered, the most relevant categories are sorted forward. For example, if you enter an amount between USD 10 and USD 60, the “Groceries” category will be sorted first. If you provide a higher amount like USD 800, the category “Rent” or “Vacation” is offered to you.
Hashtags (subcategories)
A hashtag is a double-headed keyword that is used to identify transactions with specific content and to make them findable. It can also be seen as a kind of subcategory to existing categories. You can use the hashtags to create detailed evaluations. They can be used very flexibly and therefore offer many possibilities.
You can assign your own hashtags to each category you create. To do this, you have to edit an existing category in the category view. There you can add, edit or delete hashtags. For example, you can assign the hashtags (or subcategories) “Walmart”, “Aldi” and “Trader Joes” to the “Groceries” category. As soon as you create a new transaction and categorize it with the “Groceries” category, all hashtags will be shown below the category selection. You can activate this for the transaction if necessary. You can also activate hashtags from different categories for your transaction.
Hint: You can also create special dummy categories in the category view, e.g. for the category “People” and add the hashtags “Mother”, “Father” and “Child”. If you now have a new expense for “Groceries”, you can first activate the relevant person hashtag for this transaction (for example “Father” when the father has paid for the purchases) and then make the actual categorization into the “Groceries” category. In the diagrams you can then evaluate exactly who paid for the groceries.
In the evaluations, you can then use the hashtags in a variety of ways and see exactly what you spent your money on or quickly search for certain keywords.
Text fields (title, recipient / sender, etc.)
When creating a new transaction, you have the option to use various text fields to describe your transaction below the optional information. These text fields are a kind of additional categorization because you can search for specific keywords in the evaluations and reports.
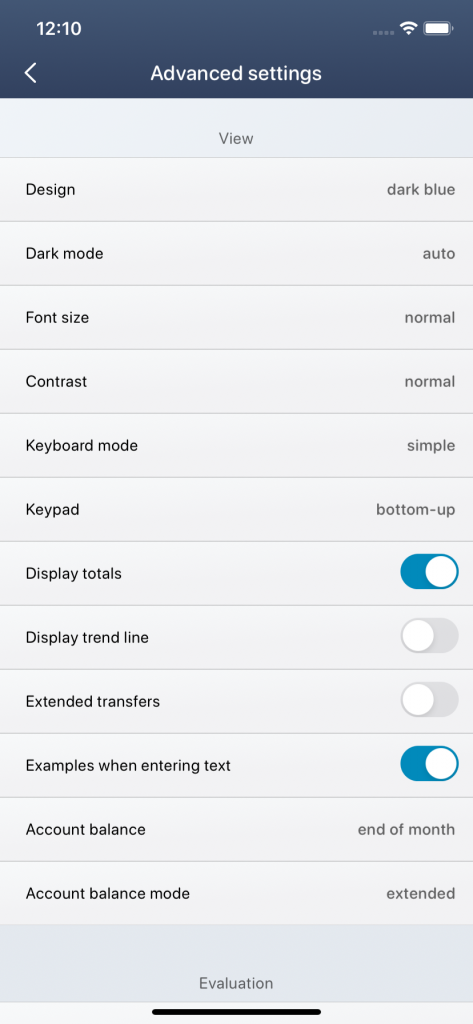
The following text fields are available: title, receiver / sender, usage and comment. You can also use these fields when importing data to fill your text fields with suitable data. If a transaction has been created with a specific receiver before, these will be shown below the text field. To do this, however, the mode for “Examples when entering text” must be activated in the advanced settings (More / Settings / Advanced settings).
Similar to the hashtags, you can also evaluate the text fields in the statistics or reports in detail. You can usually use the magnifying glass icon to search for or filter certain keywords.
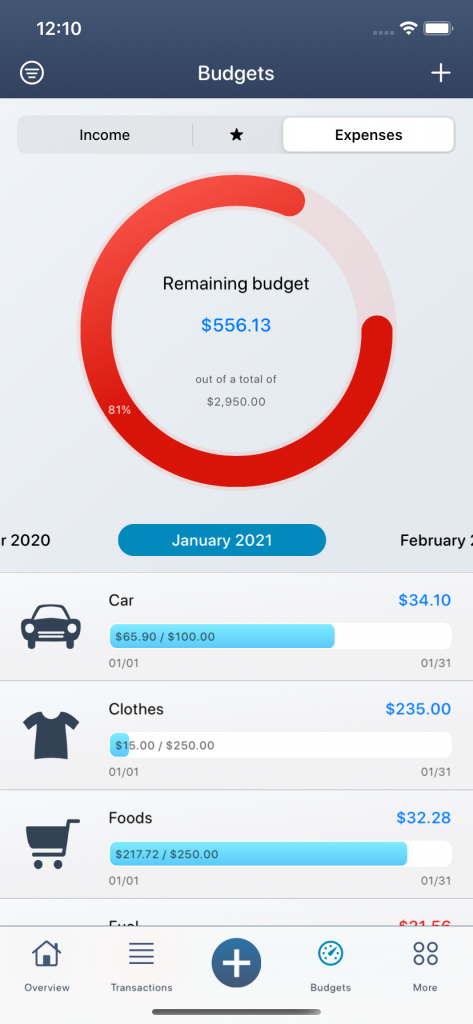
Budgets
With the help of the budgets you can pursue your financial goals (budget goals) and limits (budget limits). In this way, you keep an eye on both your income and your expenses and save money.
- You can set budget limits for your expense categories. So you set yourself a financial limit and try to adhere to it.
- You can create budget goals for your income categories. So you give yourself an amount that you want to generate according to plan.
Budget limits for expense categories
To budget your expenses, you set a financial limit. So you set yourself a budget limit and try to adhere to it. You can assign such a budget limit to each expenditure category created. How high your limit is depends on the category and your will to save money in this category. The best thing to do is to take a close look at your spending in the past few months for a particular category to get a feeling of how high your limit should be.
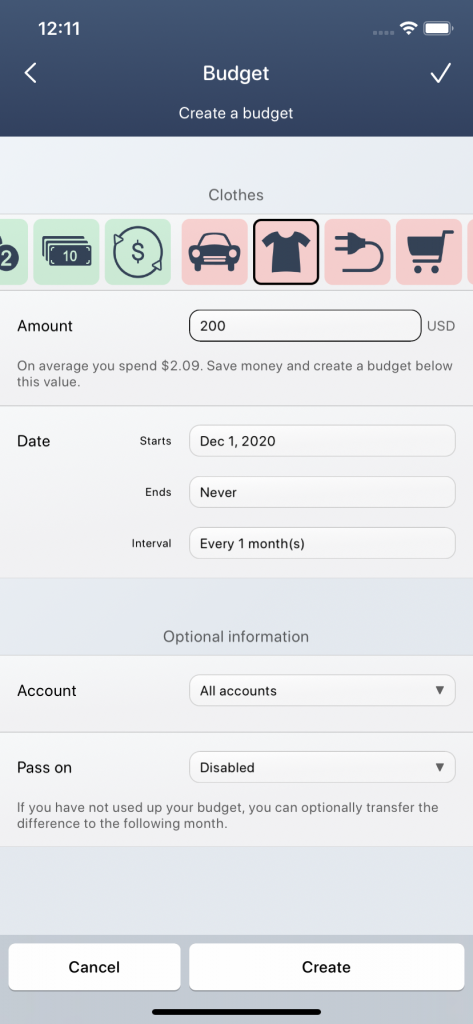
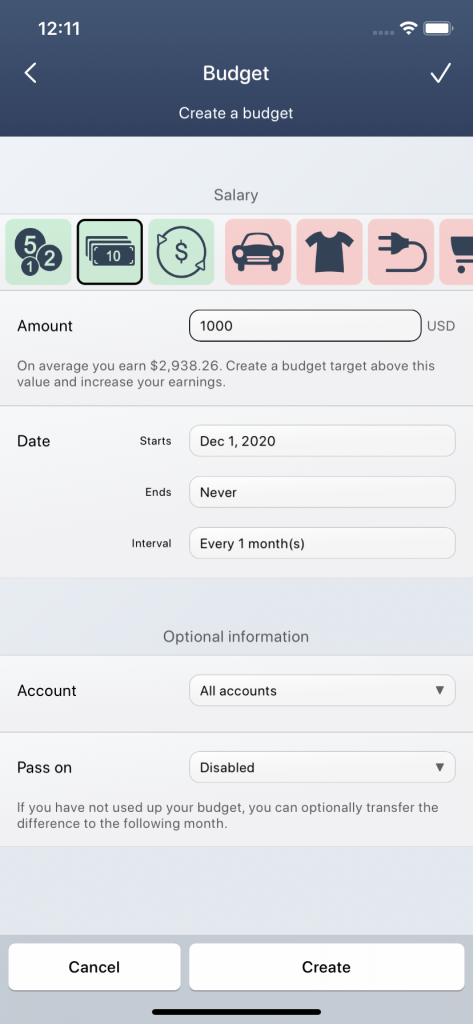
You can create a new expenditure category in the category view (under More / Settings / Categories). To create a new budget for an existing expenditure category, you have to click on the plus symbol in the budget view at the top right. Alternatively, you can click on a category below the budget diagram and edit it to create a new budget for the respective category or to edit or delete an existing budget.
For example, if you want to budget your food expenses, first select the “Groceries” category at the top by selecting the corresponding category symbol from the top bar. You can then define an amount that you do not want to exceed each month.
Note: The amount depends on the selected period and the interval. For example, if your budget only starts in the middle of the month, you only have half of the amount for the current month. If your interval is set to “Every 2 months”, you also have only half of the amount available for the current month.
Below the optional information you can also define whether your budget should only apply to a certain account or whether it should be used for “All accounts”. Finally, you can also activate the “Pass On” if you want to transfer your remaining budget to the following month.
For example, if you defined a budget limit of USD 200 per month for the “Groceries” category, this could look like this for the period from January to April:
| Date | Food costs | Budget (pass on disabled) | Budget (pass on enabled) |
|---|---|---|---|
| January | USD 200 | USD 200 | |
| 2020-01-01 | USD -50 | USD 150 | USD 150 |
| 2020-01-15 | USD -80 | USD 70 | USD 70 |
| February | USD 200 | USD 270 | |
| 2020-02-01 | USD -100 | USD 100 | USD 170 |
| 2020-02-15 | USD -20 | USD 80 | USD 150 |
| March | USD 200 | USD 350 | |
| 2020-03-01 | USD -180 | USD 20 | USD 170 |
| 2020-03-15 | USD -180 | USD -160 | USD -10 |
| April | USD 200 | USD 190 |
You can save your budget for the category by clicking on the checkmark in the top right corner. However, you can delete an existing budget at the bottom left. The category itself is not deleted, only the associated budget is deleted.
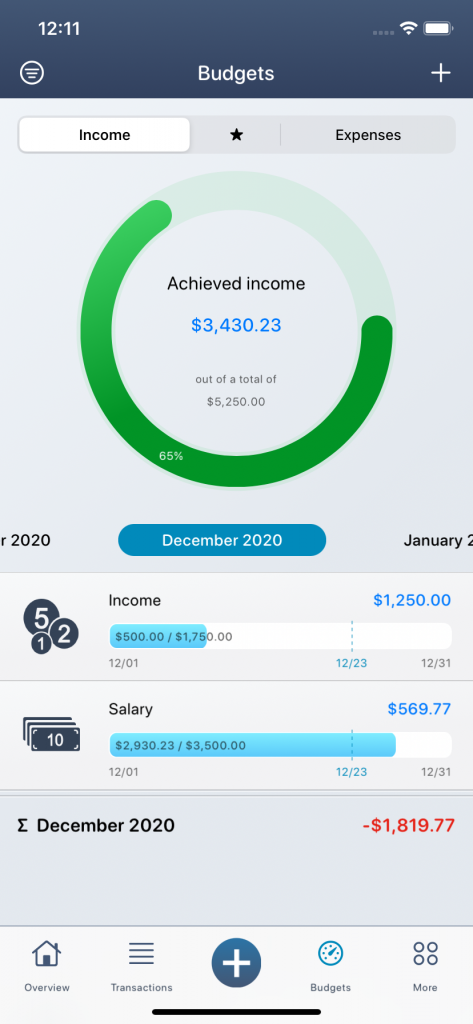
Budget goals for income categories
To budget your earnings, set yourself a budget goal. So you give yourself an amount that you want to generate according to plan. You can assign such a budget goal to each income category you create. How high your target amount is depends on the category and your sales goals. It’s best to take a close look at your earnings over the past few months for a specific category to get a feel for what your sales target should be.
You can create a new income category in the category view (under More / Settings / Categories). To create a new budget goal for an existing income category, you have to click on the plus symbol in the budget view at the top right. Alternatively, you can click on a category below the budget diagram and edit it to create a new budget goal for the respective category or to edit or delete an existing budget goal.
For example, if you want to budget your business income, you first select the “Business” category at the top by selecting the appropriate category symbol from the top bar. You can then define an amount that you would like to earn from your business as planned.
Below the optional information you can also define whether your budget goal should only apply to a certain account or whether it should be used for “All accounts”. Finally, you can also activate the “Pass On” if you want to transfer your unreached business income to the following month.
For example, if you defined a budget goal of USD 1,000 a month for the “Business” category, it could look like this for the period from January to April:
| Date | Business revenue | Budget goal (pass on disabled) | Budget goal (pass on enabled) |
|---|---|---|---|
| January | USD 1.000 | USD 1.000 | |
| 2020-01-01 | USD 400 | USD 600 | USD 600 |
| 2020-01-15 | USD 250 | USD 350 | USD 350 |
| February | USD 1.000 | USD 1.350 | |
| 2020-02-01 | USD 100 | USD 900 | USD 1.250 |
| 2020-02-15 | USD 500 | USD 400 | USD 750 |
| March | USD 1.000 | USD 1.750 | |
| 2020-03-01 | USD 900 | USD 100 | USD 850 |
| 2020-03-15 | USD 900 | USD -800 | USD -50 |
| April | USD 1.000 | USD 950 |
With a click on the checkmark on the top right you save your budget goal for the category. However, you can delete an existing budget goal at the bottom left. It is not the category itself that is deleted, but only the corresponding budget goal.
Multiple budgets for individual categories
You can also create multiple budgets for a single category. To do this, you first need to create a budget as described above for an income or expenditure category. You can then click the plus icon again in the top right to add more budgets. Here you can again select the same category as before and add more budgets to it.
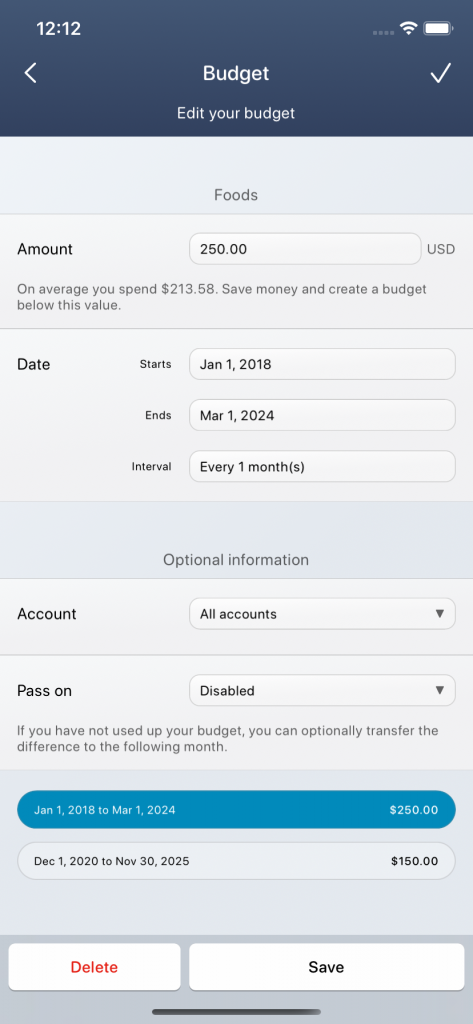
If you now edit the corresponding category in the budget view below the pie chart, you will see all the multiple budgets assigned to this category below the optional information. You can click on each of these budgets individually and edit or delete them. The periods of the budgets can also be different. Only the assigned account and the value for “Pass On” must be the same for all individual budgets.
Import of Data
With the import function you can import external data into MoneyStats. It is important that the data in a text file (e.g. a CSV file) is separated from one another by unique separators and that the text contains basic information such as date, amount and title. However, since a CSV file is not a standardized format, MoneyStats tries to recognize the structure of the CSV file automatically. If the structure is not recognized automatically, additional settings may be necessary.
Explanation: The file format CSV stands for “Comma-separated values” and describes the structure of a text file for storing or exchanging simply structured data. The file extension is .csv.
To import a new file into MoneyStats, you can click on “Import file” under More / Settings / Import and Export.
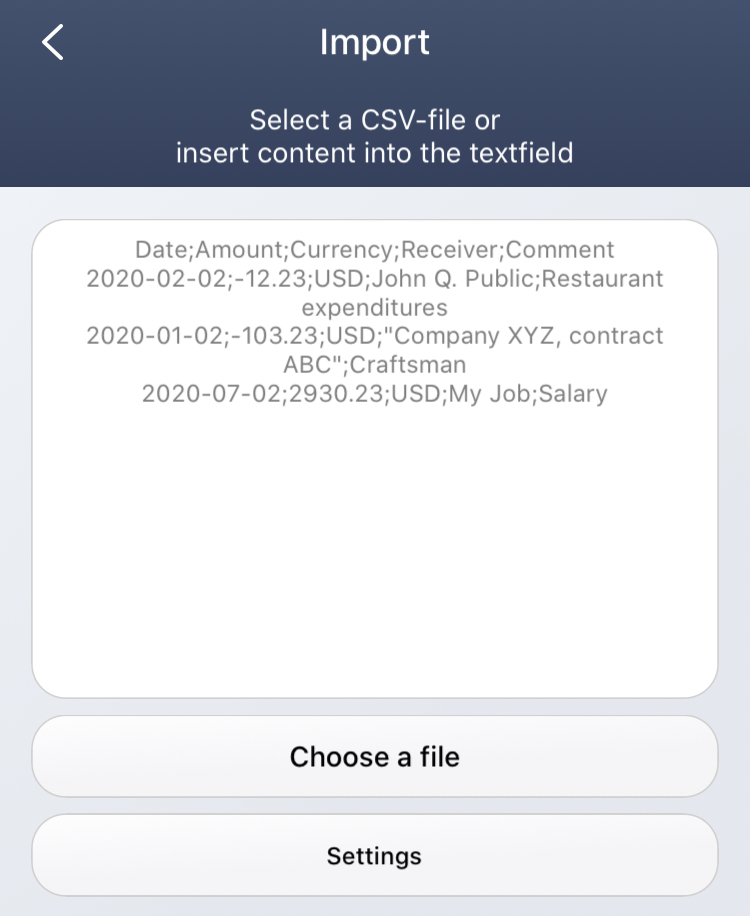
Then you will see an example of a CSV file in the text field, so that you get an idea of how the structure can look like. A CSV file is usually identified by unique delimiters. The content is comparable to a table structure, with the elements of the columns separated by semicolons and the rows separated by line breaks. Instead of a line break or a semicolon, other characters are also common. Commas, on the other hand, should be avoided because these characters appear in many sentences or in number formats and therefore the uniqueness is no longer given.
Finally, under “Select file” you can open your CSV or TXT file. This is then loaded into the text field. You should now check the text content. If the characters in the text are not displayed correctly, then click on “Change format” several times. It is switched between different character encodings (e.g. macOSRoman, ascii, unicode, utf8, etc.). At the end, all umlauts and special characters should be displayed correctly in the text field.
If the imported text has multiple paragraphs, you can select a different paragraph under “Change paragraph“. Only one complete paragraph can be read per import process.
The CSV file may be identified by special separators or there may be very special date formats that MoneyStats cannot read. In this case, you can support the import algorithm under the settings by making further specifications. Are the column elements separated by percentage signs, you can enter the “%” under “Delimiter (column)“. However, if you leave the field empty, a separator symbol is automatically searched for by default.
Similarly, you can also specify the row elements that separate the individual transactions. The hashtags symbol is often used here instead of a line break (as text character: \ n). In this case, enter a “#” in the text field under “Delimiter (row)“.
The date plays a very important role. Because without a date, the transactions cannot be classified in time. If the date format is not recognized, then look in the text field how it is structured and specify the date in the “Date format” field. Special letters are used to represent the date. For example, if your date looks like “2020-12-31” in the text field, you must enter “yyyy-MM-dd” as the date format. On the other hand, if the date looks like this: “September 12, 2020, 14:30:10”, then the specified date format looks like this: “MMMM dd, yyyy, HH:mm:ss”. There are various ways in which a date was exported and not every format can be automatically recognized by MoneyStats. If you now have the confusing date “01.02.20”, the date could represent February 1, 2020, but also January 2, 2020. Therefore, in some cases you should specify the date format.
Important: The date format is case sensitive!
Here are some examples of special date formats:
| Date | Date format |
|---|---|
| 24.02.2020 | dd.MM.yyyy |
| Monday, June 12, 2020 | EEEE, MMMM dd, yyyy |
| 31-12-20 | dd-MM-yy |
| 2019, Jun 30 | yyyy, MMM dd |
| 2020-12-31 12:30:00 | yyyy-MM-dd HH:mm:ss |
| 4:44 PM on June 23, 2016 | h:mm a ‘on’ MMMM dd, yyyy |
| 2018-09-12T14:11:54+0000 | yyyy-MM-dd’T’HH:mm:ssZ |
| Wed, 12 Sep 2018 14:11:54 +0000 | E, d MMM yyyy HH:mm:ss Z |
| Sep 12, 2:11 PM | MMM d, h:mm a |
| 10:41:02.112 | HH:mm:ss.SSS |
The letters have the following meaning:
| Char | Meaning | Char | Meaning |
|---|---|---|---|
| y | Year | H | Hour |
| M | Month | m | Minute |
| d | Day | s | Second |
| E | Weekday | S | Millisecond |
You can also set a currency factor. If you enter a value here, all your numerical values will be imported multiplied by this factor. This is useful, for example, if your amounts were exported in cents. You can enter the factor 0.01 here and then two decimal places are added to all amounts.
If the import still cannot be read after the specification, then it is best to contact me directly so that I can check what is wrong and may be able to adapt my import algorithm.
If the data import is read correctly and the date, amount and title could be assigned, you can now link the individual results with the available fields in MoneyStats.
The date, the amount and the currency are required fields. Assign the date to the date field, the amounts to the amount field and the currencies to the currency field or select a currency if this is not available in your import. Optionally, you can also add a title, a receiver, a subject or a comment, which are saved in separate text fields in the app. Balances and account balances can also be assigned to each transaction. However, all transactions then have a fixed account balance, so that this is no longer automatically calculated.
Under the “Category” field you have the option of categorizing. However, the imported field of the category must have the same name as the category created in MoneyStats (under More / Settings / Categories). Only then will the transaction be automatically assigned the appropriate category.
Tip: There are various options for automatic categorization. Under More / Settings / Advanced Settings you will find further functions under the item ‘Automation‘. You can also use the hashtags to automatically categorize your data. For example, if you have assigned the hashtag ‘Maintenance Company XYZ’ to the ‘Car’ category and your data for the title, comment or receiver contains this keyword when importing data, then this transaction is automatically assigned to the ‘Car’ category.
Finally, you can import your data into an existing or a new account. Then you should check whether all values have been imported correctly. The best thing to do is to import your data into a test account the first time, which you then delete again.
Synchronization
With the help of synchronization, you can save your data in your private iCloud and make it available to all your Apple devices. So you can work in parallel on iPhone, iPad and Mac.
New: With iOS version 4.02 or macOS version 2.02 of MoneyStats, you can now share your data with other people. To do this, you can invite other people under More / Settings / Synchronization and manage the access rights, i.e. whether the person should only have read or write access to your financial data.
Only the services offered by Apple Inc. are used for data synchronization. The data is encrypted and stored in your private iCloud to make it available to your other devices.
Note: Since data privacy is very important to me, I would like to point out that when using Apple iCloud, the data is encrypted and stored on Apple Inc. servers.
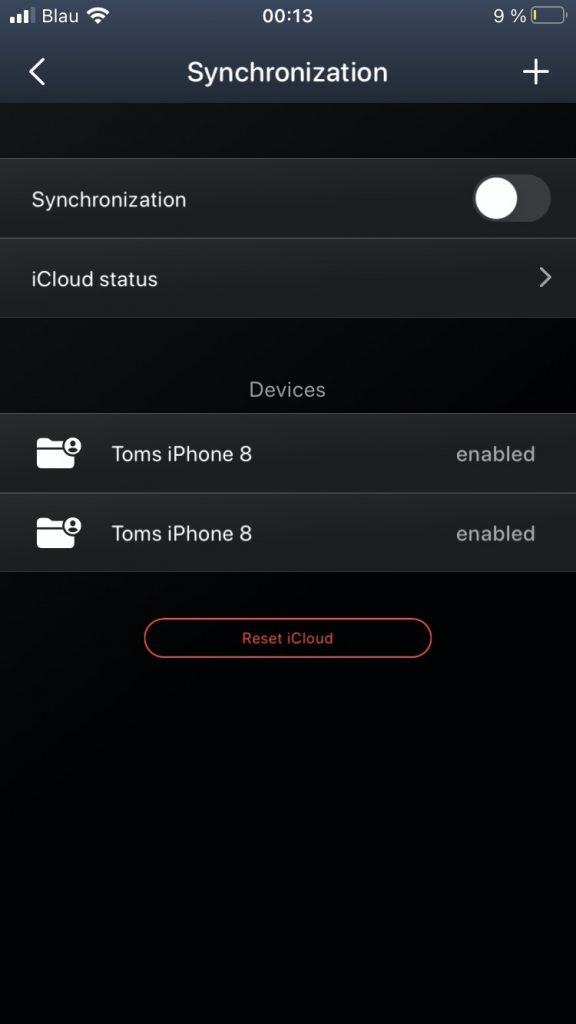
Under More / Settings / Synchronization you can add all your devices that you would like to synchronize with each other. To do this, simply click on the plus symbol in the top right to connect a new device to your private iCloud. Then you have to activate the switch button below the plus symbol.
On the overview page you can synchronize the data with your private iCloud by clicking on the cloud symbol in the top left. The latest revision is downloaded to your device.
Note: Please note that data synchronization with your iCloud does not happen all the time. The synchronization is only started when the app is opened or by clicking on the cloud symbol on the top left in the overview.
If the synchronization does not work / does not respond, you should reset the iCloud data and then set up all devices again. The best thing to do is to do the following:
- First you should create a backup of your data on the device, where the data is complete or where the data is up to date (under More / Settings / Backup / “Create a new backup”). So you are on the safe side and can restore your data at any time, if necessary.
- You can then click on “Reset iCloud” at the bottom under More / Settings / Synchronization, so that the data in your iCloud for your Apple ID for MoneyStats is practically emptied and all connected devices are removed. It is best to carry out this process for all of your devices, if this can still be selected.
- After that, you can basically set up the iCloud synchronization again. To do this, open the device with the complete database (or restore the corresponding backup to the desired device beforehand) and click on the plus in the top right. All your data will be reloaded into your iCloud.
- At this point, wait a moment until the data has been completely loaded into your iCloud. Depending on the Internet speed and the amount of data, this process can be faster or slower.
- If everything worked and the device was added to the device list, you can now do the same with the other devices and add them to the device list.
- Before you enter the second device, the previously entered basic device should appear in the list! If this is not the case, then close the app again and restart until the basic device is recognized in the list. Then do not forget to set the switch for each device to activated so that iCloud synchronization starts and is activated for the device (switch below the plus symbol in the top right corner of the synchronization menu: More / Settings / Synchronization).
If you are still facing some iCloud sync issues or your device was not added successfully to the list, please do the following troubleshooting.
